
Your kitchen countertops and backsplash are the hardworking anchors of the room, they take daily wear, catch splashes, and set the visual tone for everything else. Whether you’re tackling a full renovation or refreshing tired surfaces, choosing the right countertop and backsplash materials can transform your kitchen from dated to modern without requiring a professional contractor or a complete gut job. The good news: you have dozens of materials and styles to fit real budgets and skill levels, from DIY-friendly options to statement pieces that’ll have your neighbors asking for your designer’s number. Let’s walk through the best countertop choices, backsplash styles that actually elevate a space, and how to pair them so they work together instead of fighting for attention.
Table of Contents
ToggleKey Takeaways
- Granite and quartz countertops offer unmatched durability (lasting 25+ years) but require professional installation, while laminate and butcher block provide budget-friendly alternatives for DIY-ready kitchens.
- Countertop and backsplash ideas work best when one element is bold and the other is simple—pair a busy mosaic backsplash with a solid-color countertop to avoid visual clutter.
- Subway tile remains the most versatile and DIY-friendly backsplash option, costing $200–$600 for materials and installable in a weekend with proper spacing and grout sealing.
- To avoid color mismatches, always order countertop and backsplash samples and test them in your kitchen’s natural lighting before committing to installation.
- Butcher block countertops bring warmth and character to farmhouse and modern-rustic kitchens but require regular maintenance, immediate drying near sinks, and aren’t ideal for high-moisture areas.
- Material mixing—such as subway tile with metal accents, wood trim frames, or shelf ledges—adds intentional design dimension and elevates even affordable countertop and backsplash combinations.
Popular Countertop Materials That Fit Every Budget And Style
Granite And Quartz: Durability Meets Elegance
Granite has been the go-to premium countertop for decades, and it’s earned that reputation. It’s a natural stone, pulled from quarries, polished, and sealed, that resists scratches, stains, and heat better than almost anything short of glass. Each slab is unique, with its own color variation and grain pattern. A single slab of granite costs $60–$100+ per linear foot installed, depending on where you live and the stone’s rarity. It does require annual resealing to stay stain-resistant, and it’s heavy enough that your cabinet base needs to handle the load.
Quartz (engineered stone) offers granite’s durability without some of the upkeep headaches. Manufacturers crush quartz, mix it with resin, add pigment for color, and press it into slabs. Because it’s factory-made, colors are consistent, and it doesn’t need sealing. Quartz runs $70–$120+ per linear foot installed. Both granite and quartz outlast most other residential surfaces and hold their value.
The trade-off: both are heavy (requiring reinforced cabinetry), need professional templating and installation, and aren’t realistic DIY cuts unless you’re experienced with stone-cutting equipment. If structural work or permits apply to your installation, that’s another cost layer.
Affordable Alternatives: Laminate And Butcher Block
Laminate countertops are the budget option: a plywood or MDF base topped with a thin decorative layer and melamine seal. Modern laminates mimic marble, granite, and wood convincingly, and they come pre-edged or with separate edge banding (applied with contact cement). At $15–$30 per linear foot, laminate is accessible. Installation is straightforward if you’re comfortable with basic carpentry, cutting sink holes and joining seams is doable with a jigsaw or circular saw.
The catch: laminate isn’t heat-proof (trivets and hot pads mandatory), scratches show easily on darker colors, and the seams are vulnerable to water if not sealed well. You’ll likely replace a laminate countertop in 10–15 years versus 25+ for granite or quartz. For a renter’s kitchen or a temporary upgrade while you save for something permanent, laminate works.
Butcher block brings warmth and a lived-in feel. It’s end-grain or edge-grain wood (often walnut, maple, or oak) oiled or sealed with polyurethane. Costs run $30–$60 per linear foot. It’s also installable by a confident DIYer: secure it to the base cabinet with pocket holes, sand, and seal. That said, wood requires maintenance, regular oil treatments keep it nourished, and it can warp if exposed to excess moisture. Butcher block isn’t ideal next to a sink unless you’re diligent about drying it immediately. Knife marks and minor scratches add character but won’t fool anyone into thinking it’s indestructible. It works beautifully in farmhouse or modern-rustic kitchens.
Backsplash Styles That Elevate Your Kitchen Design
Subway Tile, Mosaic, And Statement Patterns
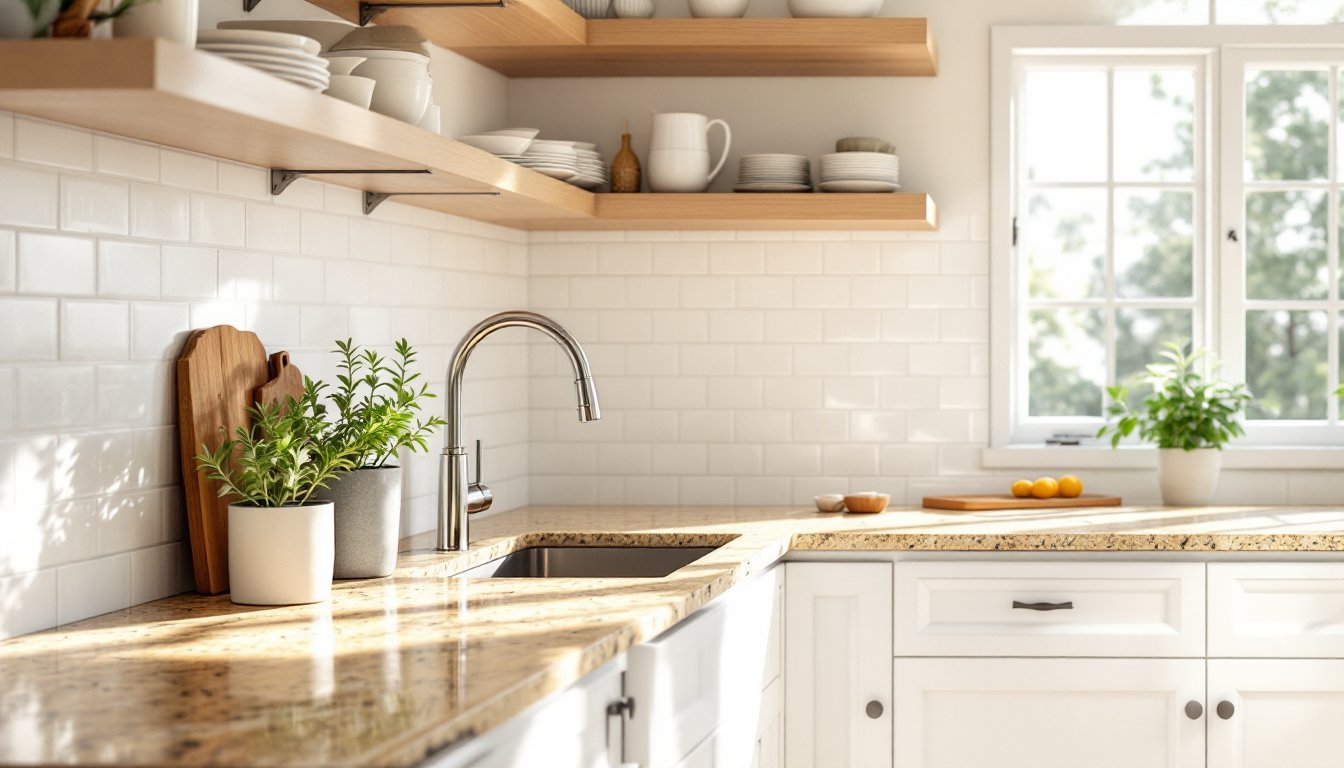
Subway tile is the default backsplash for good reason: 3×6-inch glossy ceramic tiles in white, cream, or soft gray are timeless, easy to clean, and relatively forgiving to install if you’re handy with a notched trowel. A standard subway tile backsplash (4 feet high, running the length of the counter) costs $200–$600 in materials and is very doable as a weekend DIY project if you’re not tiling your entire kitchen. Use a premixed thin-set mortar, keep the grout lines even (use spacers: they’re cheap), and seal grout after 72 hours. Subway tile works with almost every countertop.
Mosaic and patterned tiles add personality. Moroccan zellige patterns, hand-painted Portuguese tiles, or small hexagon mosaics catch the light differently than plain subway and feel curated. The downside: more grout lines mean more cleaning, and intricate patterns can clash if your countertop is also busy. Pair a bold mosaic backsplash with a simple, solid-color countertop for balance. According to design strategies for pairing countertops and backsplashes effectively, the rule is simple: if one is bold, let the other breathe.
Herringbone, subway offset, and large-format tiles (12×24 inches) create graphic impact with fewer grout lines. Larger tiles require a more precise layout and flat substrate, so surface prep is critical, any dips or waves show.
Color And Material Combinations For Impact
The best backsplash doesn’t fight your countertop: it complements it. Light counters with dark backsplash create contrast, think white quartz with charcoal subway tile or deep blue glazed ceramic. Matching neutrals (light granite with cream or soft gray tile) feel cohesive and calm. Warm wood countertops pair beautifully with warm terracotta, cream, or earthy tile in earth tones.
Material mixing also works. Subway tile with a wood trim frame, metal accents (copper or stainless steel tiles interspersed), or a wood shelf ledge above the tile adds dimension and breaks up a monolithic wall. These details cost a bit more but signal intentionality.
When sourcing ideas, kitchen design resources and curated home design guides offer real-world examples and show how color palettes shift in different lighting. What looks peachy in the showroom might shift toward orange under your kitchen’s existing light. Order a sample if you can and live with it for a few days.
If your countertop is granite with warm peachy tones, a crisp white or light gray backsplash keeps things fresh: warm terra-cotta or blush tile deepens the cohesion. The safest starting point: if you’re uncertain, choose a backsplash color that appears somewhere in your countertop’s veining or speckling. Your eye will read them as intentionally paired rather than random.
Conclusion
Choosing countertop and backsplash materials is less about following trends and more about honest assessment: your budget, how much maintenance you’re willing to do, and how long you plan to stay in the home. A laminate countertop with subway tile is a solid, affordable starting point. Granite, quartz, or butcher block paired with a thoughtful backsplash pattern tells a bigger story. Either way, prep your surface carefully, measure twice, and don’t rush installation, that’s where most DIY projects stumble. Your kitchen’s workhorse surfaces will reward the upfront care.